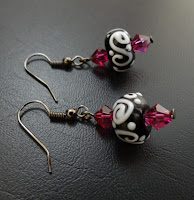
Today, I am going to talk about head pins. A head pin is basically a metal pin with a flattened head at one end; used to hold on an end bead. They can be used in so many different designs. This is how you can use them to make a simple pair of earrings.
First of all you will need to gather everything that you need: wire cutters, round nose pliers, flat nose pliers, 2 head pins, 2 earring hooks and your beads. I used 6mm bicone fuchsia Swarovski crystals and a couple of black and white lampwork beads.

1. Make sure that
your head pin is straight as they do bend easily. If it isn’t, use your flat nose pliers to
straighten it. Thread a few beads onto the head pin.
2. If you look at your round nose pliers you will notice that the round tips of the pliers are different sizes. If you are going to use the smaller tip, using your wire cutters trim your headpin leaving 1cm of wire from the beads. This will need to be longer if you decide to use the bigger tip.
 4. Grip the end of the wire with the round nose pliers and
roll to form a loop. Roll the pin rather
than grabbing the end and pulling it over as this will result in an odd shaped
loop. The rolling of the pin does not
have to be done in one move. Just
reposition the pliers to continue the rolling motion.
5. If your loop is a bit off center, don’t worry, just
straighten the loop by maneuvering it with the flat nose pliers.
6. Open the loop to attach it to the earring. Always open the loop to the side. Never open it up the way that you just rolled
it as it will stretch out the metal and it won’t sit right.
7. Put the loop of the earring on the open head pin and
close the loop.
8. Now, make another
one. People tend to like matching earrings! :)


No comments:
Post a Comment
Feel free to leave a comment; even if it is just to say 'Hi". I would love to hear from you!