Pages

Showing posts with label Recipes. Show all posts

Friday, 30 November 2012

ANZAC Biscuits


Afternoon Everyone!

Here's a little story for you:

Once there was a war.  A terrible war. It was called World War 1.  There were wives and mothers who were worried about about their men who were fighting in the war and what they were eating... as mothers and wives do.  Enter the ANZAC (Australian and New Zealand Army Corps) biscuit.  Nutritional and would keep while been sent overseas to the front line.  These biscuits are sweet and caramelly with rolled oats (to keep you feeling full for longer).

Nowadays we still love our Anzac bikkies and eat them all year round.  Here is the recipe:


ANZAC Biscuits

1 cup coconut
1 cup sugar
1 cup rolled oats
1 cup plain flour 
Pinch of salt
1 tablespoon golden syrup
4 tablespoons margarine
2 tablespoons boiling water
1 teaspoon bi-carb soda

Mix together all of the dry ingredients (coconut, sugar, rolled oats, flour and salt).
Melt the golden syrup and margarine together in the microwave.
Mix together the boiling water and bi-carb soda. 
Add to the golden syrup and margarine and then add to the dry ingredients.
Bake at 180°C for 15-20 mins or until golden brown.

Tuesday, 6 November 2012

Caramel Slice


Afternoon Everyone!

Isn't it funny that sometimes the best tasting food isn't always the prettiest.  That is the case with this slice. It's sticky and it's hard to cut the chocolate without it cracking but oh my it tastes so good!  This slice has to be the most sickly sweet, straight to the thighs, I really should only have one piece but I can't help but have more kind of treat ever!

I originally found this recipe on Best Recipes and have made it countless times and it has never failed.

Base
1 cup flour
½ cup desiccated coconut
½ cup brown sugar
125g butter, melted

Caramel Filling
½ cup golden syrup
125g butter, melted
2 x 395g cans sweetened condensed milk

Chocolate Topping
185g chocolate
3 teaspoons vegetable oil

Base:
Preheat the oven to 180°C.

Combine flour, coconut, sugar and melted butter.
Press the mixture into a 20cm x 30cm tin lined with baking paper.
Bake for 15 to 20 mins or until golden brown.
Caramel Filling:
Combine syrup, butter and sweetened condensed milk in a saucepan.  Stir over low heat for 7 minutes or until the caramel has thickened a little.
Pour over the base and bake for 20 mins or until the caramel is golden.
Refrigerate until cold.
Chocolate Topping:
Combine chocolate and vegetable oil in a glass bowl.  Melt over a saucepan of boiling water, making sure that the glass bowl doesn't touch the water. 
Spread the melted chocolate over the slice and refrigerate.
Slice and enjoy.

Now, don't forget to share...

Wednesday, 31 October 2012

Strawberry and Passionfruit Cordial

Afternoon Everyone!

Strawberry and Passionfruit Cordial

The hubster loves strawberries and he especially loves strawberry cordial.  To the point where I have a freezer full of strawberries ready to be made into cordial now that the season is about over.  This recipe is very similar to my Pineapple Cordial. 

To make Strawberry Cordial you will need:
Diced Strawberries (overripe is OK but bland strawberries won't make a very good cordial)
Water
Sugar
Citric Acid
Passionfruit Pulp


Strawberry and Passionfruit Cordial
1. Cover the diced strawberries with water and boil for 30 mins.  Put into the fridge overnight.

Strawberry and Passionfruit Cordial
2. Strain out the strawberry pulp and then rub it through a strainer so that your strawberry liquid has a lot of pulp but no seeds.

Strawberry and Passionfruit Cordial
3. Measure your strawberry liquid.  You will need a cup of sugar for each cup of strawberry liquid.  Mix together in a saucepan.

Strawberry and Passionfruit Cordial
4. Stir the combined sugar and strawberry liquid over low heat until all of the sugar has dissolved.

Strawberry and Passionfruit Cordial
5. Add 1 teaspoon of citric acid for every litre (or every 4 cups) of liquid.  Add passionfruit pulp to taste (I usually add 2 per litre).  Bottle and store in the fridge for up to 2 weeks.  

To make the cordial, mix 1/5 cordial with soda water.

Also, I have noticed that the passionfruit seeds dance when the cordial is mixed with soda water.  The bubbles will make a seed float to the top of the glass and then once the bubbles have popped the seed will fall back down to the bottom again.  Maybe I should have called this drink "The Dance of the Passionfruit Seed" or not....

Monday, 24 September 2012

Chocolate Mulberry Cupcakes


Chocolate Mulberry Cupcakes

Afternoon Everyone!

Mulberries.  They taste like my childhood.  My grandma had the best mulberry tree ever and I spent a lot of time just sitting under it and eating and eating mulberries until my hands were stained purple.

Now it is my parents who have the tree and have given me heaps of the sweet little morsels.  So I decided to pair them up with chocolate and the combination is just heavenly. 

Glorious TreatsI am quickly discovering that the best recipes on the internet are from other bloggers.  I know that I only put my absolute favourite recipes on here and it is the same for other bloggers.  So I used the recipe for chocolate cupcakes from a blog called Glorious Treats.  The icing is a buttercream that is made using mulberry juice. 

So, here it is: chocolate cupcakes with mulberry juice icing and topped with a sweet little mulberry...


Chocolate Cupcakes
(makes 24-27 standard sized cupcakes)
2 cups sugar
1 3/4 cups plain flour
3/4 cup cocoa
1 1/2 teaspoons baking powder
1 1/2 teaspoons bi-carb soda
1 teaspoon salt
2 eggs
1 cup milk
1/2 cup vegetable oil
1 teaspoons vanilla paste
1 cup boiling water

Line muffin tin with paper liners.  Heat oven to 180°C.  Add eggs, milk, oil and vanilla.  Beat on medium speed for one minute.  Stir in boiling water (the batter will be quite runny).  Fill liners 2/3 full with batter.  Bake cupcakes for approximately 22-24 minutes.  Cool completely on wire rack before icing.

Mulberry Buttercream Icing

1/4 cup butter (57g)
1/2 tub cream cheese (125g)
1/4 cup mulberry juice
3 1/2 - 4 cups icing sugar

Leave butter out until it is at room temperature.  Using electric beaters blend butter and cream cheese in a bowl until well combined.  Add mulberry juice and blend.  Gradually add the icing sugar and beat until the desired consistency is reached.  Using a star tip pipe onto cupcakes.  The buttercream may need to be returned to the fridge so that it pipes well onto the cupcakes without flopping.

Top the cupcake with a mulberry and enjoy!


Tuesday, 11 September 2012

Baked Cheesy Meatballs


Baked Cheesy MeatballsAfternoon Everyone!

I love cheese. Parmesan, brie, bocconcini, feta, mozzarella... we are all dear friends.  This is why I love this recipe.  Also, it is a good recipe to help get kids involved in the kitchen.  While I was making the sauce my niece (who was visiting at the time) made the meatballs and did a very good job too!  I originally found it in a Recipes+ magazine.


Baked Cheesy Meatballs

1 tablespoon vegetable oil
1 medium brown onion, finely chopped
2 cloves garlic, crushed
2 x 410g cans diced tomatoes
850g beef mince
2 tablespoons chopped basil
2 tablespoons chopped oregano
2/3 cup grated parmesan
200g feta, cut into 18 equal pieces
160g bocconcini cheese, coarsely cut

1. Preheat the oven to 220°C/200°C fan forced.  Lightly grease a 2 litre (8 cup) ovenproof dish.  Heat oil in large saucepan over moderately high heat.  Add onion and garlic, cook and stir for 5 minutes or until onion softens.  Add tomatoes. Reduce heat, simmer, uncovered for 8-10 minutes or until sauce thickens slightly.
2. Meanwhile, place mince, basil, oregano and half the parmesan in a large bowl.  Using clean hands, mix well to combine.  Divide into 18 portions.  For each meatball, flatten a mince portion slightly and top with a piece of fetta.  Shape mince around the cheese to enclose and form a ball.  Place in the prepared pan.
3. Pour tomato mixture over meatballs, then sprinkle with bocconcini and the rest of the parmesan.  Bake for 20-25 mins or until cheese melts and meatballs are cooked.

Note: I didn't have fresh basil or oregano so I used dried instead.  Since I love cheese so much, I sometimes put mozzarella on top too.  Can be served with pasta or salad.

Tuesday, 4 September 2012

Sweet Potato Dog Treats

A f t e r n o o n   E v e r y o n e !

Dehydrated Sweet Potato Dog Treats


I love my dog and I love my dehydrator.  So when my father-in-law mentioned that dogs love dehydrated sweet potato I was excited to give it a go.  Dog treats can be expensive and sweet potatoes are cheap and everywhere at the moment.

To make these treats, I simply peeled the sweet potatoes, cut them up lengthwise and placed on the dehydrator racks.  I usually check my dehydrator every hour or so as the bottom racks always dry things out faster.  The general rule is that anything that is put in the dehydrator is ready when it is no longer sticky or wet to touch. I always let my fruit or veggies cool on the racks before putting them in an airtight container just to be sure.  After dehydrating the sweet potato I noticed that there were a few dark spots on them that weren't there before but I don't think my dog will mind.

With my dehydrated sweet potato in hand I rushed outside to see if my beautiful dog Millie would like them.... and she LOVED them!  Success!  Now to tell my father-in-law that he was right.  Just like any man I think that he will be happy to hear those 3 little words: you were right.

Wednesday, 29 August 2012

M&M Cookies

Afternoon Everyone!

M&M Cookies


Everyone has their favourite cookie recipe and this is mine.  I have been making this recipe for years and they have always turned out perfect.  I originally got the recipe from allrecipes.com.au where they are called Subway Cookies because they do taste remarkably like the cookies that are bought at Subway.
2 cups self-raising flour, sifted
170g butter, melted
1 cup brown sugar, firmly packed
½ cup white sugar
1 tablespoon vanilla essence
1 egg
1 egg yolk
160g bag of mini M&M's
 
Preheat the oven to 165 degrees Celsius and line two cookie trays with baking paper. In a medium bowl, use beaters to cream together the melted butter, brown sugar and white sugar until well blended. Beat in the vanilla, egg, and egg yolk until light and creamy. Mix in the sifted flour. Stir in the mini M&M's by hand using a wooden spoon. Drop big, round tablespoons of the dough onto the prepared cookie trays, leaving plenty of room for spreading. Bake for 15 to 17 minutes in the preheated oven, or until the edges are lightly toasted. Cool on baking sheets for a few minutes before transferring to wire racks to cool completely.

Friday, 24 August 2012

Passionfruit Skin Jam

AFTERNOON EVERYONE!
 

Did you know that passionfruit skins contain pectin so they are perfect to make jam with.  This recipe is an old family favourite that I have enjoyed for years on my morning toast.  It is made with the white pulp of passionfruit skins. I just love recipes that use ingredients that we usually throw away.  Passionfruit jam tastes very different to what is expected but it is oh so delicious!

Passionfruit Skin Jam
Ingredients
6 passionfruit skins
Water
2 cups sugar
2 passionfruits


Put the passionfruit skins in a saucepan and cover with water.

Make sure that they have been flipped over so that the while pulp is facing down.
 
 Boil on low until the skins of the passionfruits look full and plump.  If your passionfruit is of the purple variety it will change colour to a deep purple.  Yellow passionfruit change into a light yellowly colour.  This may take about 1 hour.  Allow to cool and put the skins and water in the fridge overnight so that they will take on more water.
  
Scoop out the soft part of the skins with a spoon and discard the outer skin.  
 
Be careful not to get any of the outer skin into the jam as it has the texture of eggshell and therefore won't taste very nice.  
 
Dice up the pulp to the consistency that you like in your jam.  I like chunky bits so I dice mine up into 5mm squares.   Combine the diced pulp with the left over water until you have 2 cups.  
 
Combine with 2 cups of sugar.  Bring to the boil and boil for 15-20mins checking that the jam has reached the right consistency by putting a drop on a cold saucer that has been kept in the fridge.  I like my jam a little bit runny so that it soaks into the toast.  If you like thicker jam; boil for longer.  Make sure that every time the jam is checked, the saucepan is taken off the heat so that it doesn't continue to cook.  Once it has reached the desired consistency, add the seeds of 2 passionfruit. Pour into warm jars. Allow to cool for a while before putting the lids on and placing them in the fridge.

This is a batch that I made with yellow passionfruit.  It had a different taste, more like a marmalade.  If you are not a fan of chunky jam the pulp and water can be pureed before adding the sugar and boiling.


Sunday, 10 June 2012

Pineapple Cordial

 Afternoon Everyone!

Pineapple CordialDon't you hate wasted fruit!  I had a pineapple that was getting a bit over ripe so I decided to cut it up and put it in the food dehydrator.  The sweeter the pineapple the better it tastes dried.  I was about to throw away the skins when I remembered that my Mum used to make the best pineapple cordial. 

So here it is.  My mother's recipe for Pineapple Cordial:

Ingredients:
Pineapple Skins from 1 pineapple
Water
Sugar
½ teaspoon Citric Acid

Method:
Place the pineapple skins in a saucepan.  Cover with water.  Bring to the boil and let simmer for
1 ½ - 2 hours.  Make sure that the liquid doesn't boil down; keep topping it up with water.  The liquid should turn a lovely light brown colour.  Strain out the pineapple skins.  Measure the pineapple liquid.  For every cup of liquid you have add a cup of sugar.  Add ½ teaspoon of citric acid.  You may adjust the amount of citric acid to taste.  Stir over low heat until all the sugar has just dissolved.  Pour into a bottle and keep in the fridge.

To make the cordial: Add 1 part cordial to 4 parts water.

This drink is very refreshing on a hot summers day and is remarkably different from store bought cordial.

Wednesday, 30 May 2012

Caramel Fudge

A F T E R N O O N    E V E R Y O N E !

Caramel Fudge

I have had this recipe for years and have made it countless times as it is just that good!  I originally found it on the side of a Nestle sweetened condensed milk tin.  The secret to this fudge is the white chocolate that is added in at the end.  To package it up nicely for a friend I used an old Ferrero Rocher container and layered the caramel fudge between sheets of baking paper.


Caramel Fudge
125g butter
2 tablespoons golden syrup
395g can sweetened condensed milk
1 cup brown sugar
100g white chocolate (broken in pieces)


Line a 7cm x 25cm pan with baking paper.
Melt butter in pan.
Add golden syrup, sweetened condensed milk and brown sugar.
Stir over low heat until boiling, reduce heat, simmer 10 mins, stirring constantly.
Remove from heat, add white chocolate, mix until smooth.
Pour into prepared pan, refrigerate until set.  Cut into squares.


I hope that you enjoy this recipe.  Now the only problem is being able to stop at eating just one...


Thursday, 17 May 2012

Potato Soup

Afternoon Everyone!

Potato Soup

Quite a few years ago, a friend and I were cleaning out a storeroom when we were working for an After School Care Centre.  It obviously hadn’t been cleaned out for years so we were trying to cull and organise everything as best we could.  Things that looked old and out of date went straight in the bin.  This is where I discovered this recipe book: 

Potato Soup

It is old and tattered but in the loved kind of way.  So I fished it out and realised that it was one of those handmade recipe books where different people contribute their favourite recipes.  I adore these kinds of books as individuals only put in their absolute best recipes.  Over the past 5 years or so I have made some of these recipes and they have been utterly delicious!  So my aim is to try out every recipe in this book.  I will have to convert some ingredients over to the metric system but I think that this will be a fun cooking adventure.  So, here we go.  The first recipe that I will try is:

Potato Soup

I did modify this recipe to suit my own tastes.  I didn’t add as much salt as 3 tablespoons seems like a lot and I like to add my own garlic salt later.  I also added some pepper and substituted the parsley and some of the milk for cream and chives.  I love cheese so I added in heaps more than the recipe suggested.  So this is the final recipe that I made:

Potato Soup

1 cup chopped onion
1 tablespoon oil
4 cups chicken stock
2 cups diced potato
½ teaspoon salt (or according to taste)
½ teaspoon pepper (or according to taste)
1 tablespoon sugar
2 tablespoons flour
½ cup milk
½ cup cream
½ cup grated cheese
1 tablespoon chives


In a saucepan, cook onions in the oil until they are soft, not browned.  Add stock, potatoes, salt, pepper, and sugar and bring to the boil.  Simmer for half an hour.  Blend mixture and return to the saucepan.  Mix the flour with the milk thoroughly, add to the soup.  Add the cream.  Stir until boiling and simmer for 5 mins.  Stir in the cheese and chives.

Now that it is coming into winter this is a wonderful comfort food.  It tastes so good and wholesome and can be frozen for those cold winter nights where you just don’t want to cook.  The only thing that could possibly make this recipe any better is some bacon off the bone.  I am looking forward to having the left overs already!

Friday, 11 May 2012

Caramel Apple Dip

Caramel Apple Dip
Afternoon Everyone!

I had this dip years ago at a friend’s house and then remembered the recipe randomly in the middle of the night a week ago.  I couldn’t stop thinking about it until I made it.  I have tried it out on a few friends and they love it.  Nobody expects it to taste so good.  It is simple to make and is very addictive.

Caramel Apple Dip
1 tub of cream cheese (250g)
½ cup brown sugar
5 granny smith apples
Beat together until well combined.
That is it!  So easy and so yummy.

Thursday, 10 May 2012

Kit Kat Cake


Kit Kat CakeAfternoon Everyone

When I brought out hubby’s birthday cake last night our guests actually said “Wooooow!”, which I took as a huge compliment especially since I am not a cake decorator.  So THANKYOU Pinterest!  You make me look so much more skilled than I really am.


So, this is how I made the Kit Kat Cake.  First I made a basic chocolate cake.  I found the recipe in an old book that I fished out of the bin while cleaning out a church storeroom.  That’s another story that I will blog about soon...

Simplicity Chocolate Cake
60g butter or margarine
1 cup self raising flour
½ cup milk
2 eggs
2 tablespoons cocoa
1 cup sugar
½ teaspoon vanilla or almond essence


Melt butter.  Put all ingredients in a large bowl and pour the melted butter on top.  Beat with electric beaters for 3 mins or until well combined.  Pour into a prepared tin and bake in a moderate oven (180°C) for 30 – 35 mins.  The cake is ready when a skewer is inserted and comes out clean.

To decorate the cake I modified a recipe of Cream Cheese Icing.  Click here for the original recipe.

Buttercream Icing
¼ cup butter (at room temperature)
½ tub of cream cheese (125g)
¼ cup cocoa
2 cups icing sugar
2 – 3 tablespoons cream


Using electric beaters blend butter and cream cheese in a bowl until well combined.  Add cocoa and blend.  Gradually add the icing sugar and beat until smooth.  Add the cream until you get the consistency that you want.

Decorate the Cake
3 – 4 blocks of family size kit kats (broken into individual pieces)
2 bags of M&M’s
Ribbon

After icing the cake, position the kit kats around the outer edge.  Tie the ribbon around the kit kats.  Pour the M&M’s into the center.


That’s it!  So easy and yet it looks so good!  Come to think if it there is still some left in the fridge.  Mmm afternoon tea time I think….

Wednesday, 9 May 2012

Lego Sugar Cookies


Afternoon Everyone!
Lego Sugar Cookies
We all love Lego, right? So when I saw this tutorial on Sweet Sugar Belle of how to make Lego cookies, I had to give it a go. I decided to make the lego men as well as the lego bricks. 

First of all I made the sugar cookie recipe from GloriousTreats:

Sugar Cookies
3 cups plain flour
1 teaspoon baking powder
1 cup/238g butter at room temperature
1 cup caster sugar
1 egg
1 teaspoon vanilla essence


1.       Stir together the flour and baking powder in a bowl and set aside.

2.       Using an electric mixer cream together the butter and sugar until light and fluffy.  This should take around 3 mins.

3.       Add the egg and vanilla.  Beat for another minute.

4.       Add the flour to the mixture slowly.

5.       Blend until all the flour is incorporated and the dough begins to come away from the sides of the bowl.

6.       Take the dough out of the bowl and knead it.

7.       Put some baking paper on top of the dough and roll it out using a rolling pin to around 8mm high.

8.       Put the sugar cookies on a baking pan lined with baking paper.

9.       Put the baking pan with the cookies in the fridge for 3-5 mins so that they won’t spread when in the oven. 

10.   Bake the cookies for 8-10 mins depending on the size of the cookies.  They should be just starting to take on a golden tone. 

I drew up a template for the lego man head and cut it out of an old ice-cream container lid.  You can see the dimensions that I used in the picture.  I simply placed it on top of the rolled dough and traced around it with a knife.  I found that once I picked it up I needed to flatten the sides with the side of my knife. For the bricks I cut the dough into rectangles of 6.5cm x 3cm.

I let the cookies cool overnight and then made up some Royal Icing the next day:

Royal Icing
1 ½  tablespoons of meringue powder (Pavlova Magic)
2 cups icing sugar
3 tablespoons of warm water


Beat all ingredients until stiff peaks form.  Make sure that all the utensils are grease free or the icing won’t reach its proper consistency.
Recipe from
 Wilton.com

Decorating The Lego Man
1.       Using a piping bag, outline the cookie with black icing.  This will create a dam.

2.       When the black icing is dry, flood the top and bottom rectangle with yellow icing.  Icing used for flooding needs to be thinned or the final result will look lumpy.  Thin the icing with 1 teaspoon of water per cup of icing.  Only add in half a teaspoon at a time until the right consistency is reached.

3.       Flood the center of the cookie with more yellow icing.  I like to pipe the icing on in a spiral pattern so that it flows on evenly.  Use a toothpick to spread out the icing or fix up any bubbles.

4.       After the icing is dry (I left mine overnight) pipe on the eyes and smile.

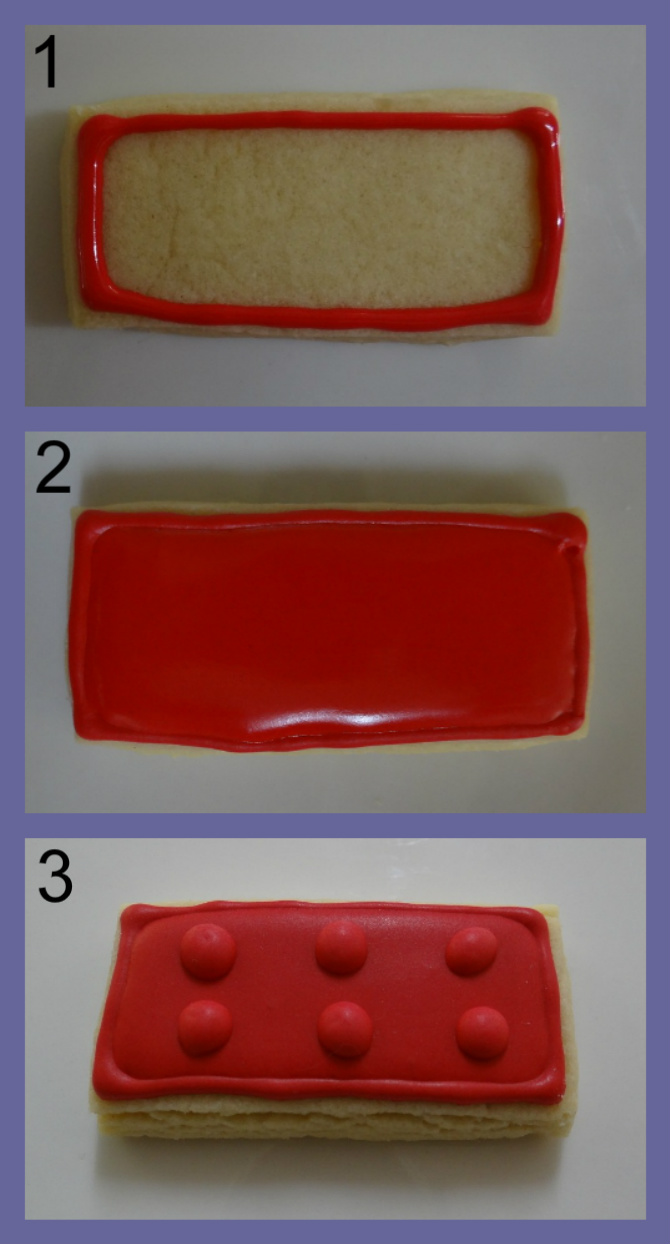
Decorating the Bricks
1.     Using a piping bag outline the cookie.


2.   When the outline is dry, flood the center with thinned icing.


3.   Pipe on 6 dots when the icing is dry.  Don’t use the thinned icing or the dots will run off the cookie.


I had some left over icing so I grabbed some Malt-O-Milks out and used up all of the left over icing on those.  They look so much better than I expected.  Since they are rectangles, I think that I will use them next time to make the Lego Bricks instead of making the sugar cookies.

So, this was my first time decorating sugar cookies and although it sounds easy it took a lot longer than I expected.  Especially because I only had 1 piping bag, so there was a lot of cleaning and refilling.  I am very happy with the results.  They don’t look as good as the ones in the Sweet Sugar Belle tutorial.  But I am very impressed with how cute they are.  Now, to eat them….