Pages

Monday, 30 April 2012

Easy As Earrings

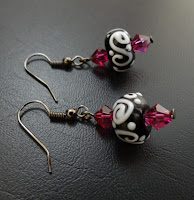
Beaded EarringsAfternoon Everyone!


Today, I am going to talk about head pins.  A head pin is basically a metal pin with a flattened head at one end; used to hold on an end bead.  They can be used in so many different designs.  This is how you can use them to make a simple pair of earrings. 


First of all you will need to gather everything that you need: wire cutters, round nose pliers, flat nose pliers, 2 head pins, 2 earring hooks and your beads.  I used 6mm bicone fuchsia Swarovski crystals and a couple of black and white lampwork beads.


1.  Make sure that your head pin is straight as they do bend easily.  If it isn’t, use your flat nose pliers to straighten it. Thread a few beads onto the head pin.


2. If you look at your round nose pliers you will notice that the round tips of the pliers are different sizes.  If you are going to use the smaller tip, using your wire cutters trim your headpin leaving 1cm of wire from the beads. This will need to be longer if you decide to use the bigger tip.

3. Use the flat nose pliers to bend the wire to a 45° angle.


4. Grip the end of the wire with the round nose pliers and roll to form a loop.  Roll the pin rather than grabbing the end and pulling it over as this will result in an odd shaped loop.  The rolling of the pin does not have to be done in one move.  Just reposition the pliers to continue the rolling motion. 


5. If your loop is a bit off center, don’t worry, just straighten the loop by maneuvering it with the flat nose pliers. 


6. Open the loop to attach it to the earring.  Always open the loop to the side.  Never open it up the way that you just rolled it as it will stretch out the metal and it won’t sit right.


7. Put the loop of the earring on the open head pin and close the loop.

8. Now, make another one. People tend to like matching earrings! :)

In my last beading tutorial I made a memory wire bracelet.  Head pins can be used to put beads or charms on the ends.
Memory Wire Bracelet

Rolling the loops on head pins takes a little practice but it is a technique worth mastering.  I am sure that you will have the offcuts of wire pinging off the walls in no time!

Thursday, 26 April 2012

Memory Wire Bracelet

Afternoon Everyone!

Glass Pearl Bracelet

I LOVE beading! So, I thought that I would share how to create some accessories.  Today I am going to show you how to make a bracelet using memory wire.  Memory wire is great to use when making bracelets for friends as it is one size fits all.  It comes in rings (like a spring) and you just cut off the amount that you need. 


First of all you will need a few things:


Making a memory wire bracelet is easy. Just follow these 4 easy steps:


1. Cut off 4 coils from the memory wire.  A memory wire bracelet is usually 3 coils long but as the wire will stretch out under the weight of the beads it is best to cut off 4 coils.  More is better than less!

2. Using the round nose pliers roll the wire so that it forms a loop.  It is easier to roll into the curve of the wire than out.

3. Thread on the beads in any order that you desire: randomally or in a pattern.

4. Trim off the excess memory wire 1cm away from the last bead.  Roll the wire around the round nose pliers as you did in step 2.

NOW YOU'RE DONE!

For something extra you could add some beads onto the loops using a head pin.  I will be covering how to do this next.

Wednesday, 25 April 2012

The Greener Cleaner Challenge

Afternoon Everyone! 

This is what my kitchen cupboard looks like. I think that it is time to change to some more natural products.So I have decided to try Natural Cleaning and call it The Greener Cleaner Challenge.So, first things first, I started by doing a little bit of research on the net.I have now come to realise that there 3 main benefits to Natural Cleaning:

·Health (breathing in all of the cleaning chemicals is not good)
·Environment (just think of all of the landfill)
·It’s cheaper!

The fact that has really convinced me that it is time to change is:
Over 100 chemicals commonly found in homes have been linked to allergies, cancer, headaches, depression, chronic fatigue and respiratory problems. Our Environment: It’s a Living Thing

I am going to choose 1 commercial product a week and try to find a natural alternative that is just as effective.

My first product that I am going to replace is this Multi-Purpose Cleaner:
Here is the recipe that I tried from this Fact Sheet.I chose this recipe because I wanted something that I could store ready for each use and used essential oil so that my house didn’t smell too much like vinegar.Since I decided to use an old Pine O Clean bottle (now that’s recycling) I had to divide the recipe by 3.
Ingredients:
1 cups of water,
2 tablespoons vinegar,
1 tablespoon bi-carb soda
1 drop essential oil (I used Lemon Eucalyptus Eucalyptus Citriodora).
Method:
Mix ingredients together, apply with a spray bottle.


The Result
After putting the All Purpose Cleaner to the test on my stove top I realised that the mixture was too thick to come out of the spray bottle easily.So I added another ½ cup of water, a tablespoon of vinegar and a drop of essential oil.

I am very impressed with the final result. Not only does my kitchen smell lovely but the spray worked just as well as the Pine O Clean.I even prefer it as it didn’t leave a soapy residue.
Here is the final recipe that I used:

Multi-Purpose Cleaner

Ingredients:
1 ½ cups of water,
3 tablespoons vinegar,
1 tablespoon bi-carb soda
2 drops essential oil

Method:
Mix ingredients together, apply with a spray bottle.

Look! My clean stove with my greener alternative.
No more commercial cleaners for me!
Next week I will try and find a more natural replacement for Glass and Mirror Cleaner.

Tuesday, 24 April 2012

Welcome!

Afternoon Everyone!

Welcome to the start of my new adventure: blogging. I have recently stopped working to become a stay at home mum so I have decided to write down all of the things that I do to keep myself entertained while living in outback Queensland. I love creating new things as well as cooking.  I must tell you that most of the things that I will post here I did not come up with on my own but I will always endeavour to give credit to my sources. I am often asked how did you make that? So now I can say “I have a blog. Check it out!”